
 Pin it
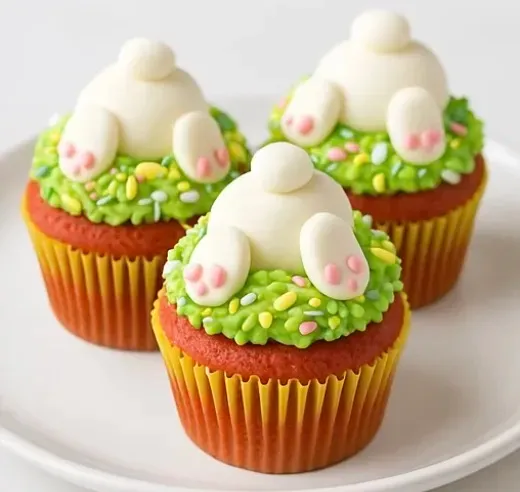
Cute, colorful, and totally fun - these Bunny Bottom Cupcakes mix yummy taste with sweet Easter vibes. They've got pink and purple cake inside that looks amazing when you bite them, plus fluffy buttercream topped with the sweetest little bunny bottoms. Adding vanilla pudding to the mix makes them super moist and soft, while a hint of almond gives them a fancy touch. They're perfect for Easter parties, springtime get-togethers, or just to make someone happy - these playful treats look as good as they taste!
I came up with this idea when I needed a cute Easter treat both kids and grown-ups would enjoy. The cool two-color surprise inside paired with those adorable bunny decorations makes these real showstoppers, and the pudding mix and flavor extras make them taste way better than regular box mix cupcakes. Whenever I bring these to parties, they always vanish first!
Key Ingredients and Smart Picks
- White Cake Mix: This works as your plain starting point for adding colors. Go for a good brand for the tastiest results.
- Vanilla Pudding Mix: This makes everything softer and moister. Grab the instant kind, not the cooking version.
- Almond Extract: Adds a fancy flavor twist alongside the vanilla. Real extract works better than fake stuff.
- Gel Food Coloring: Makes bright colors without making the batter watery. Brands like Chefmaster work way better than regular liquid colors.
The type of extracts you choose really matters in these cupcakes. When I switched to fancy vanilla bean paste and real almond extract, the taste jumped from just okay to amazing - adding richness and layers of flavor that turn these from simple treats to something special.
Step-by-Step Baking Guide
- Step 1: Mix Your Better Batter
- First, heat your oven to 350°F and put paper liners in your cupcake pan. In a big bowl, mix together a box of white cake mix, a box of instant vanilla pudding, 1 teaspoon vanilla extract, and 1/2 teaspoon almond extract. Add whatever the cake box says, plus one extra egg and two more tablespoons of oil. These extras make everything richer and more moist. Beat everything on medium for about 2 minutes until it's smooth and well mixed.
- Step 2: Make Your Color Magic
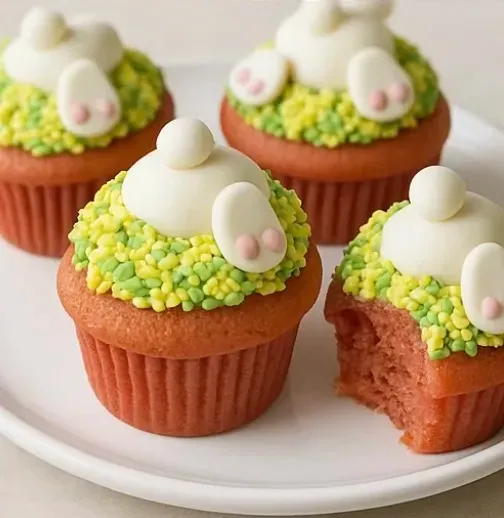
- Split the batter evenly into two bowls. Add pink gel coloring to one bowl and purple to the other, adjusting until you like the shade. Start small and add more as needed - these colors are strong so you don't need much. Using a cookie scoop or measuring cup, put some pink batter in each liner, filling about 1/3 up. Then add purple batter on top, filling to about 2/3 full. This creates separate color layers that show up when someone takes a bite.
- Step 3: Bake Them Just Right
- Put your cupcakes in the hot oven and bake according to the box, usually around 18-20 minutes. Check if they're done by sticking a toothpick in the middle - it should come out clean or with tiny crumbs. Because of the pudding, they might need an extra minute or two beyond what the box says. Let them cool in the pan for 5 minutes, then move them to a wire rack to cool completely before adding frosting.
- Step 4: Whip Up Your Frosting
- While they cool, make your buttercream. In a big bowl, beat 3 sticks of soft butter until smooth and creamy, about 2-3 minutes. Slowly mix in 3 cups of powdered sugar, beating well each time. Add 1 teaspoon vanilla extract or vanilla bean paste and 3-4 tablespoons of heavy cream, then beat in the last 3 cups of powdered sugar until everything's light and fluffy. Split the frosting, putting 2/3 in one bowl and coloring it yellow, and the rest in another bowl, making it pink.
- Step 5: Make Them Look Amazing
- Put the yellow frosting in a piping bag with a round tip. Squeeze a big mound on top of each cool cupcake, then quickly roll it in "Cottontail" sprinkles to cover it. Next, grab another piping bag with a 1M star tip and fill it with pink frosting. Pipe a pretty swirl on top of the sprinkled yellow frosting. Finally, stick a royal icing bunny bottom on each cupcake, making it look like it's diving into the frosting. If it won't stay put, add a tiny dot of extra frosting underneath.
 Pin it
The first time I tried making these, I learned not to fill the liners too much. I put in too much batter and they spilled over while baking, ruining the nice layer effect. Now I'm careful to fill them only about 2/3 full, which gives me perfectly rounded cupcakes with pretty color layers.
Ways to Present Them
These fun cupcakes can be shown off in so many ways depending on your event. For Easter parties, put them on a tiered stand with spring flowers or decorative Easter grass around them. For kids' parties, set them on a bright platter with small chocolate eggs scattered nearby for extra fun. They also work great as single desserts at place settings - just put one at each person's spot for a sweet surprise that doubles as table decor.
Fun Twists to Try
After making these cupcakes tons of times, I've tried several different versions to keep things interesting. For chocolate fans, try chocolate cake mix with chocolate pudding and make a cookies-and-cream look with black and white batters. For a spring garden theme, go with green and blue batters and top with flower decorations instead of bunnies. During Christmas, red and green batters with snowman toppers look super festive. The basic method stays the same - just switch up the colors and decorations to match your party.
Keeping Them Fresh
You can make parts of these cupcakes ahead if you're busy. The plain cupcakes without frosting can be baked a day early and kept in an airtight container on your counter. The frosting can also be made a day ahead and stored covered in your fridge - just bring it to room temperature and mix it briefly before using. Once they're all decorated, the cupcakes taste best within two days but will stay good for up to three days in an airtight container at room temp. If you need to plan further ahead, you can freeze the unfrosted cupcakes for up to a month, then thaw and decorate when needed.
 Pin it
These Bunny Bottom Cupcakes have become my go-to spring treat for good reason. They mix the simplicity of dressed-up cake mix with impressive looks and better flavor. The two-color surprise makes guests say "wow" when they take a bite, while the cute decorations bring smiles to everyone from kids to grandparents. Perfect for Easter but sweet enough for any spring gathering, these cupcakes show how basic ingredients can turn into something really special with just a bit of creativity.
Frequently Asked Questions
- → Where can I buy bunny feet decorations?
- You can find pre-made candy bunny feet at baking supply shops, craft stores like Hobby Lobby or Michaels, or online retailers like Amazon around Easter. If unavailable, get creative with white chocolate and pink candies to craft your own.
- → Can these cupcakes be made ahead of time?
- Definitely! Bake them 1-2 days in advance and store in an airtight container at room temperature. Make the frosting a day early too—just fridge it, let it soften, and whip again before using. Wait to decorate until serving day so the sprinkles don’t bleed into the frosting.
- → What can I use instead of almond extract?
- If you don’t have almond extract or need an alternative, try upping the vanilla extract to 1½ teaspoons or using coconut extract for a similar twist. Lemon or orange extract, about ½ teaspoon, can bring a fresh flavor too.
- → Is it possible to skip the cake mix?
- Yes, you can use a homemade white cake recipe for about 24 cupcakes and include a small box (3.4 oz) of vanilla pudding mix with your dry ingredients. This ensures a light-colored batter to keep those vibrant food colors shining through.
- → What sprinkles work best for decorating?
- Look for spring-inspired pastel sprinkle mixes with green shades to mimic grass. Jimmies or tiny round sprinkles (nonpareils) work great since they stick easily to frosting. Avoid bigger pieces or sugar crystals, which may fall off when handling.
- → How do I make the layered color effect?
- Use separate spoons for each colored batter. First, spread a pink layer to fill ⅓ of the liner. Next, carefully add a purple layer on top, up to ⅔ full. Be gentle so the colors don’t mix too much, and leave a little space for the cupcakes to rise.