
 Pin it
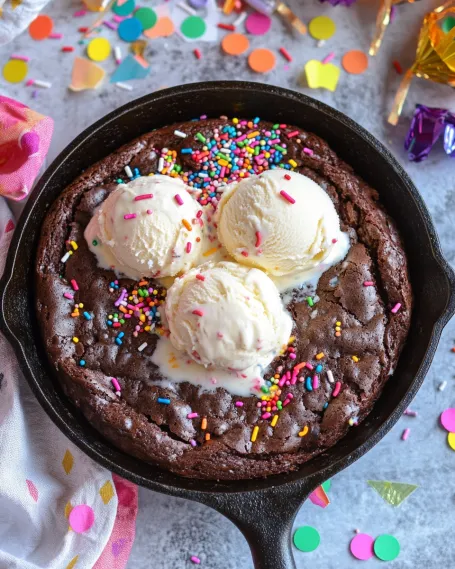
There's a touch of wonder in desserts that turn regular days into special moments, and this Funfetti Brownie Skillet does just that. A rich brownie foundation packed with vibrant sprinkles hides a surprise layer of chopped Birthday Cake Lindor Truffles that melt into creamy puddles of sweetness. The whole thing gets topped with ice cream scoops, chocolate sauce drizzles, and extra sprinkles for a treat that looks as amazing as it tastes. Whether you're actually celebrating or just want to bring some joy to your table, this skillet creation delivers party vibes any day you want.
A few weeks ago, I whipped this up for a friend who was feeling blue, calling it her "unbirthday" treat. When I put the warm skillet with quickly melting ice cream in front of her, she couldn't help but smile. After we dug into that perfect mix of warm brownie, melty truffles, and cold ice cream, we'd completely forgotten about our everyday worries in favor of pure dessert happiness.
Key Components and Shopping Guidance
- Brownie Mix: Go for a premium fudgy brownie mix as your foundation. While scratch-made brownies taste great, using a mix makes this dessert quick and easy for any occasion.
- Birthday Cake Lindor Truffles: These special white chocolate treats with colorful bits add creamy sweetness and festive flair. Can't find them? Just use regular white chocolate truffles with extra sprinkles, or try another flavor that works well with chocolate.
- Rainbow Sprinkles: Buy good sprinkles that won't quickly bleed colors into your batter. The long, thin ones (jimmies) work best when baking.
- Ice Cream: Plain vanilla lets the brownie shine, but birthday cake flavor creates a perfect theme match. Pick a fancy brand with high fat content for the smoothest melting.
What makes this dessert so special is how a few fancy ingredients turn basic brownies into something amazing. The first time I tried making this, I couldn't believe how the Lindor truffles melted into the brownie, making pockets of smooth goodness that made everything taste better.
Step-by-Step Baking Guide
- Step 1: Get Everything Ready
- Start by heating your oven to 350°F and giving a 9-inch cast iron pan a good spray with baking spray. Cast iron gives you those awesome crispy edges while keeping the middle soft and gooey. Make sure your pan is well-seasoned so nothing sticks and cleanup is a breeze. Cut all your truffles into quarters before you start mixing so everything flows smoothly.
- Step 2: Mix Your Colorful Batter
- Follow the brownie mix box instructions, but don't mix too much or you'll get tough brownies. Once everything's just combined, gently stir in 1/2 cup of rainbow sprinkles with a rubber spatula. Fold just enough to spread the sprinkles around without making the colors run. Your batter should be thick but still pourable.
- Step 3: Build Your Dessert
- Pour half the brownie mix into your greased pan, using a spoon to push it all the way to the edges. This bottom layer is your dessert's base. Next, scatter the chopped Lindor pieces across the surface, but keep them about 1/2 inch from the edges so they don't melt out during baking. Carefully spoon the rest of the brownie mix on top, gently spreading it to mostly cover the truffle layer. Don't worry about making it perfectly smooth – a rustic look adds charm.
- Step 4: Nail the Cooking Time
- Bake your brownie skillet for 25-30 minutes, watching closely near the end. You want crispy edges that pull away slightly from the pan, with a middle that's still soft but not raw. A toothpick stuck about 2 inches from the edge should come out with a few moist bits, while the center will be softer because of the melted truffles. Remember that the brownie keeps cooking a bit after you take it out.
- Step 5: Add The Finishing Touches
- Let the pan cool for 5-10 minutes before serving. This cooling time helps the brownie set up while keeping that warm, gooey center. Add big scoops of ice cream around the skillet so everyone gets the perfect brownie-to-ice cream ratio. Pour warm chocolate sauce over everything and finish with another handful of rainbow sprinkles for that birthday party look. Serve right away with spoons for everyone to dig straight into the pan.
 Pin it
I learned some important timing lessons from my first try at this recipe. I kept it in the oven too long and ended up with brownies that were more cakey than gooey. Now I always take it out a little early, knowing the leftover heat will finish the job perfectly without overcooking it.
Tasty Presentation Ideas
Turn this dessert into a fun activity by setting up a topping station next to it. Put out small bowls with different ice cream flavors, warm sauces (chocolate, caramel, and strawberry), and various toppings like smashed cookies, nuts, and several types of sprinkles. Let everyone fix their own portion for a personal touch. If you want something fancier, dish out individual servings in small bowls, adding a birthday candle to each one for a special feel even when it's nobody's birthday.
 Pin it
Tasty Alternatives
While the birthday cake version brings the fun, I've come up with several other flavors too. For a campfire feel, use chocolate truffles in the middle and top with marshmallow ice cream and graham cracker bits. During winter holidays, try mint chocolate truffles with peppermint ice cream and crushed candy canes. For chocolate fans, use double chocolate brownie mix with dark chocolate truffles and chocolate ice cream for a super chocolatey experience that still looks amazing.
Prep-Ahead Strategies
This treat tastes best fresh from the oven, but you can get things ready ahead of time to make it easier. You can mix the brownie batter and keep it in the fridge for up to 24 hours before baking - just let it sit out for about 20 minutes to warm up before putting it in the skillet. If you have leftovers, store them in a sealed container and warm individual portions in the microwave for 20-30 seconds before adding fresh ice cream on top.
 Pin it
This Funfetti Brownie Skillet has become my favorite way to make regular nights feel special. There's something magical about gathering around a warm pan filled with gooey chocolate, melting ice cream, and colorful sprinkles that brings people closer and creates happiness. What makes this dessert great isn't just how good it tastes, but how it shows us we don't always need a reason to enjoy something exceptional - sometimes the dessert itself becomes the reason to celebrate.
Frequently Asked Questions
- → Can I switch the truffle flavors?
- Definitely! The Birthday Cake ones are festive, but you could use any kind you’ve got. Classic milk chocolate, dark, or white truffles all work great. Mixing flavors is also a fun option to try!
- → What if I don’t have a cast iron pan?
- That’s okay! Swap it for any round, oven-safe dish like a 9-inch cake pan or even a glass pie dish. Just check doneness a bit earlier since heat distribution might differ.
- → Can I skip the box mix and go homemade?
- Sure! If homemade is more your thing, grab your favorite recipe for a 9-inch pan. Layer it just the same: batter first, then truffles, more batter on top. You’ll get that fresh-baked vibe.
- → When’s the perfect time to take it out of the oven?
- Look for edges that are set and crispy, with a center that’s just slightly gooey. Stick a toothpick in about 2 inches from the edge—it should come out with moist crumbs. It’ll keep firming as it cools!
- → Can I prep this ahead for an event?
- Yep! Bake it a day before, let it cool, and cover it up. Warm it back up at 300°F for 10 minutes before serving. Add ice cream right before presenting for maximum wow factor.
- → Any unique spins to try?
- Absolutely! Toss in 1/2 cup of nuts or peanut butter chips with the batter. For a s’mores vibe, top it with marshmallows near the end of baking. Get creative for holidays with themed sprinkles and matching truffle flavors, or change the ice cream to match different occasions.