
 Pin it
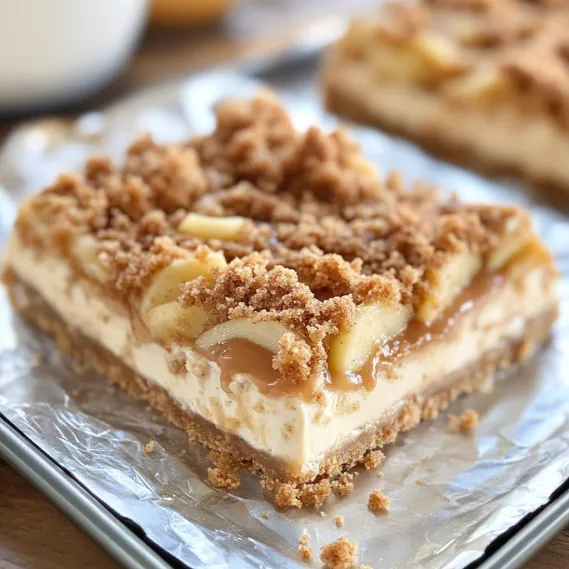
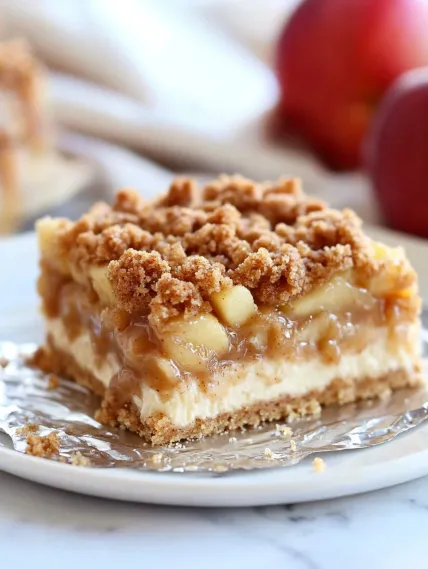
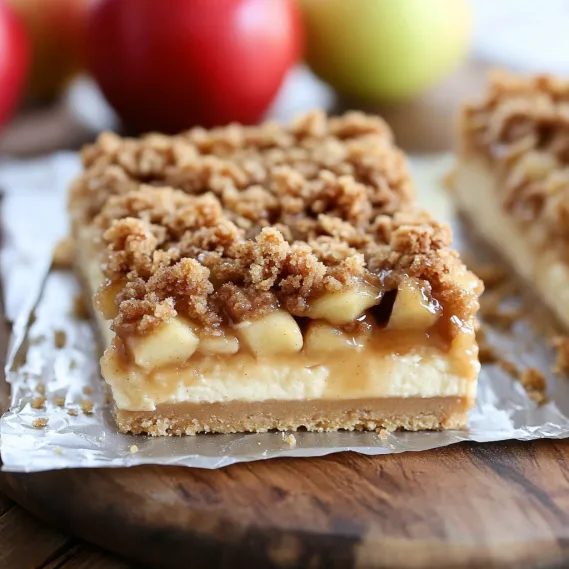
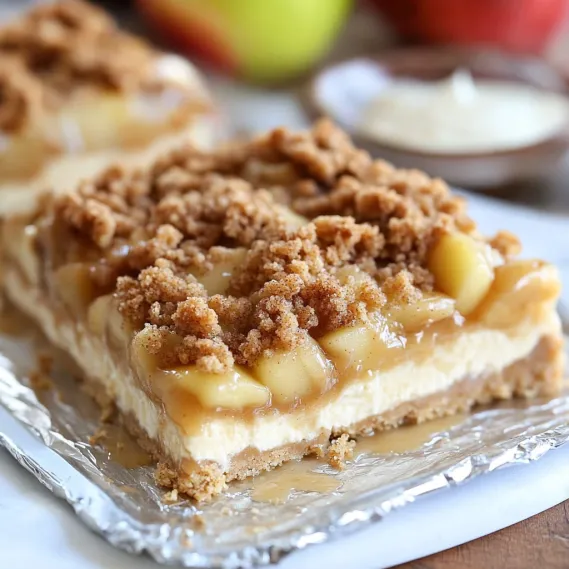
When buttery shortbread meets velvety cheesecake, soft cinnamon-infused apples, and crumbly streusel, you get a sweet treat that showcases the best fall flavors. These Caramel Apple Cheesecake Bars stack multiple layers of different textures and matching tastes, topped with a generous caramel drizzle. While many folks focus on pumpkin during autumn, these bars prove that apples should get just as much attention. They blend soft fruit, warm spices, and rich caramel to capture fall's essence in every well-balanced mouthful.
I brought these bars to my book club once and everyone stopped talking mid-sentence to grab another piece. Even my neighbor who always says she "doesn't care for sweets" asked me for the recipe before leaving. The magic of these bars comes from how each part stands out while still creating something better together - they've got just the right mix of textures and flavors that make you want just one more bite.
Key Ingredients and Smart Selection
- Apples: Go for hard, slightly tart varieties like Granny Smith, Honeycrisp, or Pink Lady that won't turn mushy when baked. The contrast between tangy apples and sweet caramel makes these bars stand out.
- Cream Cheese: Always pick full-fat cream cheese and let it warm up completely before using. Cold cream cheese will stay lumpy no matter how much you mix it.
- Butter: Don't swap this out - real butter is crucial for both the shortbread base and crumbly top. Its taste is central to making this recipe work and substitutes just won't cut it.
- Caramel Sauce: Homemade is fantastic, but a good store-bought option works great when you're busy. Look for one with actual butter and cream listed in the ingredients for the best flavor.
Using top-notch ingredients really makes a difference in a layered treat like this. When I tried making these bars with freshly picked orchard apples and fancy European butter with extra fat, they turned out so amazing that everyone kept asking what my trick was.
 Pin it
Step-by-Step Baking Guide
- Step 1: Nail the Shortbread Foundation
- Start by mixing soft butter and sugar until it's fluffy, then add flour and salt just until it comes together. The mix will look crumbly but should stick when pressed. Push it firmly into your lined pan, making sure it's even with no thin spots. Bake until the edges just start to look golden - around 15 minutes. This pre-bake makes sure the bottom can hold up all the good stuff we'll add later.
- Step 2: Whip Up the Creamy Cheesecake
- While your crust bakes, beat room-temp cream cheese with sugar until it's totally smooth with no lumps. Add eggs one by one, mixing well after each. Stir in vanilla, but don't overmix once the eggs are in. Pour this smooth mixture over the warm crust and spread it out to reach all the corners. The warmth from the crust helps the cheesecake settle perfectly.
- Step 3: Get the Apple Layer Ready
- Peel, core and slice your apples thinly, then mix them with sugar, cinnamon, and a tiny bit of nutmeg. How thick you cut your apples matters a lot - too thick and they'll stay hard, too thin and they'll disappear. Aim for slices about 1/8-inch thick for just the right bite. Lay these spiced apple slices over the cheesecake, slightly overlapping them so every bite gets some apple goodness.
- Step 4: Top with Crumbly Streusel
- Mix flour, brown sugar, oats, cinnamon and cold butter chunks until you get coarse crumbs with some bigger butter bits. Work quickly with your fingers to keep those butter pieces intact - they make the perfect crumbly texture. Sprinkle this mix evenly across the apples, covering everything. The streusel adds great crunch and soaks up some juice from the apples as they bake.
- Step 5: Bake, Cool and Add Finishing Touches
- Bake until the streusel turns golden and the cheesecake sets around the edges but still jiggles slightly in the middle. Let everything cool completely before putting it in the fridge for at least 2 hours, but overnight works even better. This waiting time lets all the flavors mix together and helps the cheesecake firm up. Just before serving, warm up your caramel sauce a bit and drizzle it generously over your cut bars, letting it run down the sides for a show-stopping look.
 Pin it
I learned about patience the hard way with my first batch of these bars. I rushed the cooling and ended up with a tasty but messy dessert. Now I always make them a day ahead, giving them plenty of time to chill properly. That overnight rest also lets the apple flavor spread throughout the bars, making them taste even better.
Stunning Serving Ideas
These bars can work for casual snacking or fancy desserts depending on how you present them. For a dinner party, place single bars on pretty plates with a small scoop of vanilla ice cream and extra warm caramel drizzled on top. For a fall get-together, arrange them on a wooden board with some cinnamon sticks and fresh apple slices for a rustic display. They work just as well at a bake sale or tucked into lunch boxes - their flexibility is part of what makes them so great.
Year-Round Variations
While apples shine in this recipe, you can switch things up based on the season. In summer, I've swapped in fresh peaches for the apples and added a bit of nutmeg to the streusel with fantastic results. During winter gatherings, adding a spoonful of bourbon to the caramel sauce creates a grown-up flavor that goes perfectly with after-dinner coffee. The basic formula - shortbread, cheesecake, fruit, streusel - works with whatever fruit looks best at the market.
Planning Ahead and Storage
These bars actually get better with time, making them perfect for preparing ahead. You can make them up to three days before you need them and keep them in the fridge, though I suggest waiting to add the caramel until right before serving so they look their best. They freeze really well for up to a month - just thaw them overnight in the fridge before serving. When freezing, cut them into pieces first and put parchment paper between layers so they don't stick together.
 Pin it
What started as my brother's favorite recipe has become one of my go-to desserts. There's something really satisfying about making a treat with so many different elements that work perfectly together. The mix of shortbread, cheesecake, soft apples, crunchy topping, and smooth caramel creates a range of textures and flavors in every bite. Though they need a few extra steps and dirty more dishes, these caramel apple cheesecake bars are worth the effort, giving you an amazing dessert that captures fall's best flavors in an easy-to-hold package.
Frequently Asked Questions
- → Is it possible to prepare these ahead?
- Absolutely! They get even better when made early. You can prepare them up to 2 days in advance and keep them refrigerated under a cover. You can also store the caramel sauce separately for up to 7 days. Before serving, let the bars sit at room temperature for 20-30 minutes and gently heat the caramel before pouring it on top.
- → Are these bars freezer-friendly?
- Definitely. Slice them into smaller portions first, then place them in an airtight container with parchment between layers. They can stay frozen for up to 3 months. When ready to enjoy, let them thaw overnight in the fridge. If possible, freeze them without caramel and add fresh caramel once thawed for the best flavor.
- → What's the best apple variety to use?
- Granny Smith apples are excellent because their tartness balances the dessert's sweetness, and they stay firm while baking. If unavailable, try similar varieties like Honeycrisp, Pink Lady, or Braeburn. Avoid softer types like Golden Delicious or Red Delicious – they'll go mushy during baking.
- → Can I use store-bought caramel instead?
- Of course! While homemade caramel tastes better, a good-quality store option works fine. Pick a thick caramel (often labeled 'topping' instead of 'syrup') for better coverage. Slightly warm it before drizzling for the best results.
- → Why did my crumble topping melt instead of staying crisp?
- It probably melted because the butter was too soft or liquid. For a crumbly texture, keep the butter cool but soft. You can also chill the prepared crumble for 15 minutes before baking. Make sure your oven temperature isn’t too high to avoid melting butter too quickly.
- → How small should I chop the apples?
- Aim for pieces no larger than 1/4 inch. If they’re too big, they’ll bake unevenly and could make cutting messy. Too small, and they might vanish into the filling. You want bite-size chunks – noticeable, but not overpowering.