
 Pin it
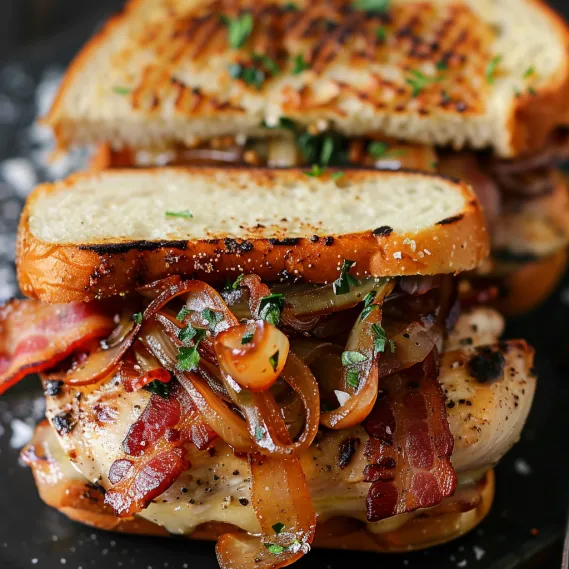
Nothing beats biting into a perfect bacon sandwich—that wonderful mix of crunchy, flavorful bacon with sweet, soft caramelized onions between pieces of toasted bread. This isn't your run-of-the-mill sandwich; it's comfort food that turns a few basic items into something amazing. Every part does its job—the bacon brings smoky goodness, the onions add sweet complexity, and the bread ties everything together for that perfect mouthful.
I made these sandwiches during our family Sunday morning meal last week. My husband usually eats quickly without much comment, but he actually paused halfway through to mention how the onions' sweetness completely changed what would've been just a regular bacon sandwich. My teenage kid, who normally takes sandwiches apart to eat the pieces one by one, wolfed his down super fast and immediately wanted another.
Key Ingredients and Shopping Advice
- Bacon: Go for thick-cut strips for the best feel and taste. Look for bacon with good fat marbling—the fat melts during cooking to make those yummy crispy bits. I like bacon with applewood or hickory smoke for extra flavor depth
- Onions: Yellow onions work great for caramelizing since they have just the right amount of natural sugar. Pick ones that feel heavy and firm with no mushy spots. Cut them into thin, even slices so they cook at the same rate during caramelizing
- Bread: Choose a solid bread that can handle the fillings—I really like sourdough for its slight tang and sturdiness. Good white sandwich bread or whole grain works well too, whatever you prefer
- Butter and Olive Oil: Using both creates the ideal mix for caramelizing onions—butter gives rich taste while olive oil stops everything from burning during the long cooking time
The quality of what you buy really matters for this sandwich. The first time I spent extra on locally made thick-cut bacon from a small butcher shop, I noticed a big difference in taste—it had less water so it crisped better and had stronger bacon flavor.
Step-by-Step Cooking Guide
- Step 1: Get Those Onions Perfectly Caramelized
- Mix olive oil and butter in a big pan over medium-low heat until butter completely melts. Throw in your thinly sliced onions with a tiny bit of salt, then cook them slowly for 25-30 minutes, stirring now and then so they don't burn. Don't rush this part—you want those deeply sweet, jam-like caramelized onions, not just quick-cooked ones. They're done when they've shrunk down a lot and turned a rich golden brown color.
- Step 2: Cook Bacon Just Right
- While your onions are doing their thing, lay bacon strips flat in a cold pan. Start with the pan cold and heat it up to medium—this lets the fat melt slowly for evenly cooked, perfectly crispy bacon. Flip occasionally until the bacon gets as crispy as you like, usually 8-10 minutes. Move to paper towels to soak up extra grease, but save those tasty drippings if you want to make your sandwich even better.
- Step 3: Get Your Bread Ready
- Lightly toast your bread slices so they'll hold up to the fillings. For extra flavor, brush one side of each slice with some of that leftover bacon fat before toasting. Your bread should be golden and crispy outside but still soft inside to match well with the fillings.
- Step 4: Put It All Together Carefully
- Spread your favorite sauce on both bread slices inside—good mayo helps keep everything from getting soggy. Put the caramelized onions on the bottom slice, then add the bacon in an even layer. If you're adding extras like lettuce or tomato, put them between the onions and bacon to keep the crispy stuff from getting soft from touching the onions directly.
- Step 5: Enjoy It At The Right Time
- Finish by adding the top bread slice and cutting corner to corner for the best look. Eat right away while the bacon stays crispy, the onions are warm and fragrant, and the bread is still toasty. This timing gives you all the temperatures and textures that make this sandwich so special.
 Pin it
When I first tried making this sandwich, I tried to hurry the onions by turning up the heat, which left me with partly burnt, partly raw onions. I've now learned that keeping that medium-low heat and being patient is totally worth it. Those properly caramelized onions turn a basic bacon sandwich into something you'll really remember.
Tasty Pairing Ideas
Make this bacon sandwich a full meal by adding the right sides. When it's cold out, I serve it with creamy tomato soup for the ultimate comfort food combo—the soup's tanginess balances the rich sandwich perfectly. For something lighter, try a simple arugula salad with lemon dressing that adds a peppery, fresh contrast to the sandwich's savory flavors. When having friends over for brunch, I cut the sandwiches into four pieces and serve them as fancy finger food alongside some fresh fruit.
 Pin it
Tasty Twists to Try
While the basic version is amazing, I've come up with several different takes that offer tasty options. Adding a fried egg with a slightly runny yolk makes a breakfast version that's super rich—the yolk acts like a natural sauce that makes both the bacon and onions taste even better. For a bigger lunch option, sometimes I add sliced avocado and a layer of good cheddar cheese that gets a bit melty from the warm ingredients. The creamy avocado and sharp cheese work so well with the bacon and onions.
Time-Saving Tricks
To make things easier, especially when feeding lots of people, I often cook a big batch of caramelized onions ahead of time. They keep well in the fridge for up to a week and can be warmed up when needed. This advance work turns what could be a time-consuming sandwich into something you can put together in just minutes. The caramelized onions actually get better after a day or two as the flavors mix and develop more.
 Pin it
What I really like about this basic-looking sandwich is how it shows what happens when good ingredients get the care they deserve. Watching raw onions change into sweet, jammy strands through slow cooking, paired with crispy bacon between toasted bread slices, makes something much better than you'd expect from the parts alone. It reminds me that sometimes the most satisfying foods aren't the fanciest or priciest—they're the ones made with understanding and respect for what each ingredient can become.
Frequently Asked Questions
- → Can I swap chicken breasts for thighs?
- Absolutely! Boneless thighs are a great option and often turn out even juicier. Skip pounding them thin, but still coat in flour before searing. Adjust cooking time to ensure they hit 165°F inside.
- → What if I don’t want to use wine?
- You can easily replace the wine with extra chicken broth and add a splash (about 1 tablespoon) of white wine vinegar or lemon juice for acidity. The taste will still be balanced.
- → Is frozen spinach okay instead of fresh?
- Yes, frozen spinach works fine! Make sure it’s thawed completely, then press out all the water. Use around 1 cup of thawed spinach to replace roughly 3 cups of fresh.
- → What are good sides for this dish?
- Pair it with pasta, mashed potatoes, or rice to soak up the sauce. For something lighter, go for roasted veggies, a basic salad, or cauliflower rice. Crusty bread is also perfect for scooping up every drop.
- → Can it be made lighter or low-calorie?
- Sure! Swap the half and half for whole milk or evaporated milk, and cut the butter down to 1-2 tablespoons. You can also add extra spinach for more veggies. It won't be as rich but will still taste great.
- → Can I prep it ahead of time?
- You can! Pound and season the chicken a day in advance, storing it in the fridge. The sauce can also be prepped separately and reheated on the stove. If reheating the full dish, do it slowly with a splash of broth to keep the sauce from splitting.